Monday, 20 January 2014

Smart Contact Lens Product from Google


Here is the good news from the search engine giant. Google has made a contact lens that will analysis the glucose present in your tear and

if the sugar level goes high in the tear the circuit in the lens start's glowing. It also sense whether the sugar level is below to the normal

The product is still under the testing phase we have to wait little more to get this amazing product.

for more details click below.....

Monday, 6 January 2014

Simple Implementation of ListView in Android.

In the last tutorial I have showed how we can implement a GridView in android now i will show how we can add a array of string in an List View without using a BaseAdapter Class . Adding a String array in ListView is considered to be a most simple way to use an ListView. List View is easy and attractive way to display the data Now days you will see that the most of the application uses the list view and by this the application also look attractive. So lets start.

First Step :-
           
Take a list view in your activity_main XML file like this.

<RelativeLayout xmlns:android="http://schemas.android.com/apk/res/android"
    xmlns:tools="http://schemas.android.com/tools"
    android:id="@+id/RelativeLayout1"
    android:layout_width="match_parent"
    android:layout_height="match_parent"
    android:orientation="vertical"
    tools:context=".MainActivity" >

    <ListView
        android:id="@+id/list"
        android:layout_width="match_parent"
        android:layout_height="wrap_content"
        android:layout_centerHorizontal="true"
        android:layout_centerVertical="true" >
    </ListView>

</RelativeLayout>

Second Step:-

Now create another XMl file and put an TextView in it. Name the file as list_item.xml.

<?xml version="1.0" encoding="utf-8"?>
<LinearLayout xmlns:android="http://schemas.android.com/apk/res/android"
    android:layout_width="match_parent"
    android:layout_height="match_parent"
    android:orientation="vertical" >
   
    <!-- Single ListItem -->
   
    <!-- Product Name -->
    <TextView android:id="@+id/product_name"
        android:layout_width="fill_parent"
        android:layout_height="wrap_content"
        android:padding="10dip"
        android:textSize="16dip"
        android:textStyle="bold"/>   

</LinearLayout>

Third Step:-

Now comes to source code open the MainActivity and the create a string array, ListView and ArrayAdapter.

private final String[] Itdelhi = new String[]
{"ItDevelopersDelhi","Android","SEO","Wed Development" };
ArrayAdapter<String> adapter;
ListView lv;

 put the following code in oncreate function.

 lv = (ListView) findViewById(R.id.list);
 adapter = new ArrayAdapter<String>(this, R.layout.list_item, R.id.product_name, Itdelhi);
 lv.setAdapter(adapter);

Now we are ready to execute the code.

Snapshots:-


Friday, 3 January 2014

Simple Implementation of GridView in Android

Today I am going to explain you How you u can implement a grid view and put button in the cells of grid view. Grid view is used to render a view at your own or we can say that you can customize the a group of objects by your own suppose you want a create a horizontal list of weekdays

which i am going to explain in this tutorial So for that some of you would take a image and put it in a button or image view or some of you will create a separate widget of each day.


But the easiest method would be the implementation of grid view. Its an example you can create an list or any view by using grid view.So lets start

1. create a layout file with the name gridcell and put following XML code in that.

<LinearLayout
    xmlns:android="http://schemas.android.com/apk/res/android"
    android:orientation="vertical"
    android:layout_width="wrap_content"
    android:layout_height="wrap_content">

    <Button
        android:id="@+id/gridcell"
        android:layout_gravity="center"
        android:textColor="#FFFFFF"
        android:background="@drawable/calendar_button_selector"
        android:textAppearance="?android:attr/textAppearanceMedium"
        android:layout_width="wrap_content"
        android:layout_height="wrap_content">
    </Button>
</LinearLayout>

 2. Now put the following code in your main XML file

<RelativeLayout xmlns:android="http://schemas.android.com/apk/res/android"
    xmlns:tools="http://schemas.android.com/tools"
    android:id="@+id/RelativeLayout1"
    android:layout_width="match_parent"
    android:layout_height="match_parent"
    android:orientation="vertical"
    tools:context=".MainActivity"
    >
    <GridView
        android:id="@+id/days"
        android:layout_width="fill_parent"
        android:layout_height="wrap_content"
        android:horizontalSpacing="-1px"
        android:numColumns="7"
        android:verticalSpacing="-1px" >
    </GridView>
</RelativeLayout>

 3. Now comes the coding part. Create a class Days and extend it with BaseAdapter. and put the following code


Context context;
    private final List<String> list;
    private Button gridcell;
    String[] week;
   
    public Days(Context applicationContext, int gridcell, String[] weekdays) {
        // TODO Auto-generated constructor stub
               
                this.context=applicationContext;
                this.week=weekdays;
                this.list = new ArrayList<String>();
    }

    @Override
    public int getCount() {
        // TODO Auto-generated method stub
        return week.length;
    }

    @Override
    public Object getItem(int position) {
        // TODO Auto-generated method stub
        return position;
    }

    @Override
    public long getItemId(int position) {
        // TODO Auto-generated method stub
        return position;
    }

    @Override
    public View getView(int position, View convertView, ViewGroup parent) {
        // TODO Auto-generated method stub
       
        LayoutInflater inflater = (LayoutInflater) context.getSystemService(Context.LAYOUT_INFLATER_SERVICE);
        convertView = inflater.inflate(R.layout.gridcell, parent, false); 
        gridcell = (Button) convertView.findViewById(R.id.gridcell);
        gridcell.setText(week[position].toString());
       
        return convertView;
    }


4. Fourth and final step create a object of the Days class and initialize it after and initialize the grid view also.

Days dayAdapter;
GridView days;
 private final String[] weekdays = new String[] { "Sun", "Mon", "Tue", "Wed", "Thu", "Fri", "Sat" };


after this put days variable as a set adapter object.


  dayAdapter= new Days(this, R.id.gridcell,weekdays);
  days=(GridView)findViewById(R.id.days);
       
  days.setAdapter(dayAdapter);


Snapshots:-


https://adf.ly/bYMfSClick to Download The Project


Monday, 30 December 2013

create a new package in android

hi guys today i am going to tell you how you can create a new package in android and resole the reference error in that package. we create a new package to keep over project in a organised manner so that if we want to change anything afterwords we don't have to search in the whole project. so lets start..... 

First step
right click on the src directory of your project and click on new package 


Second step
enter the package name like com.xxxx.xxx.xxx and click ok


Third step
now your new package will be created and now you have to create a new class file in that package


Fourth step
after doing this extend your class with activity and create oncreate function in that set the content view to any of the layout file. 

Fifth step

now save it you will see that the there is an error on R.layout.activity_main to remove this error remove the import android.R; 

and add 

import com.your.mainpackage.name.*;

or if it still shows the error create chage the above import statement to 

import com.your.mainpackage.name.R;


Thursday, 26 December 2013

Splash screen in android application

Today In this tutorial i am going to explain you how we can add a splash screen to our android application. Splash screen is basically a screen which comes for few seconds when we opens a application. this makes our app more impressive because we can put a image of our origination. So lets start ......

First Step:- Create a layout in which you have to add a background image to the layout like this.

<?xml version="1.0" encoding="utf-8"?>
<LinearLayout xmlns:android="http://schemas.android.com/apk/res/android"
    android:layout_width="match_parent"
    android:layout_height="match_parent"
    android:background="@drawable/splesh_screen"
    android:orientation="vertical" >

</LinearLayout>

Second Step:- Now its time to write some coding. In the java file you have to create a thread and make the thread sleep as per your convince.Put the code in oncreate method 

the code will be......

        
        Thread timer = new Thread(){
            public void run(){
                try{
                    sleep(5000);
                }catch (InterruptedException e){
                    e.printStackTrace();
                }finally {
                    Intent wp = new Intent(splash.this,MainActivity.class);
                    startActivity(wp);
                }
            }
        };
        timer.start();
   

Snapshots:-


https://adf.ly/bF8NK Click here to Download the project :-

Sunday, 22 December 2013

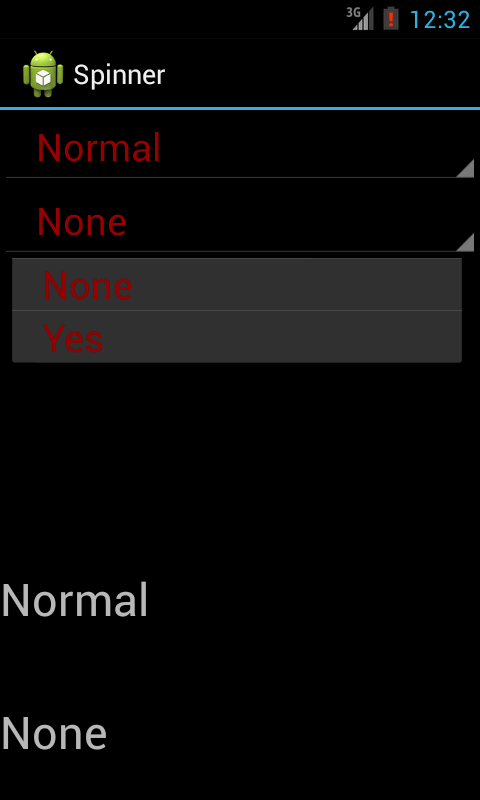
how to Implement two spinners in one activity in android

Today i am going to explain you how to implement two spinners in one activity. many of the android application developers gets a situation in which they have to implement two spinners on one module. generally they are required when you want to take a query from the user. By the use of the spinner you can make your application more attractive and it is also very user friendly because user can choose the option from that he don't have to write anything.

So lets start -

First steps : - create a drawable folder in the res directory and create a XML file in it lets say row.XML
                    like this ....

<?xml version="1.0" encoding="utf-8"?>
<LinearLayout xmlns:android="http://schemas.android.com/apk/res/android"
android:layout_width="fill_parent"
android:layout_height="wrap_content"
android:orientation="horizontal"
>

<TextView
    android:id="@+id/value"
    android:layout_width="wrap_content"
    android:layout_height="wrap_content"
    android:paddingLeft="20dp"
    android:text="Interested in"
    android:textColor="#990000"
    android:textColorLink="#990000"
    android:textSize="25sp" />

</LinearLayout>

Step Two:- Go to your layout folder and add two spinners in that and two text view. we are taking text view to show the value which is selected by the user.

Main XML Code:-

<RelativeLayout xmlns:android="http://schemas.android.com/apk/res/android"
    xmlns:tools="http://schemas.android.com/tools"
    android:id="@+id/RelativeLayout1"
    android:layout_width="match_parent"
    android:layout_height="match_parent"
    android:orientation="vertical"
    tools:context=".MainActivity" >

    <Spinner
        android:id="@+id/spinner2"
        android:layout_width="wrap_content"
        android:layout_height="wrap_content"
        android:layout_alignParentLeft="true"
        android:layout_below="@+id/spinner1" />

    <Spinner
        android:id="@+id/spinner1"
        android:layout_width="wrap_content"
        android:layout_height="wrap_content"
        android:layout_alignParentLeft="true"
        android:layout_alignParentTop="true" />

    <Button
        android:id="@+id/result"
        android:layout_width="wrap_content"
        android:layout_height="wrap_content"
        android:layout_centerHorizontal="true"
        android:layout_centerVertical="true"
        android:text="click"
        android:visibility="invisible" />

    <TextView
        android:id="@+id/textView1"
        android:layout_width="match_parent"
        android:layout_height="wrap_content"
        android:layout_alignParentLeft="true"
        android:layout_below="@+id/result"
        android:layout_marginTop="51dp" />

    <TextView
        android:id="@+id/textView2"
        android:layout_width="match_parent"
        android:layout_height="wrap_content"
        android:layout_alignParentLeft="true"
        android:layout_below="@+id/textView1"
        android:layout_marginTop="48dp" />

</RelativeLayout>

Step Three :- Now we will do some coding. first initialize the spinner after that  set an string arrayadapter to take the reference of row.XML file and a string array. after that set adapter on the spinner and adapter is your arrayadapter and at last set OnItemSelectedListener on the spiner. your code will be look like this.

        spinner1=(Spinner)findViewById(R.id.spinner1);
        ArrayAdapter<String> adapter = new ArrayAdapter<String>(this,
        R.drawable.row, R.id.value, Dinner);
        spinner1.setAdapter(adapter);
        spinner1.setOnItemSelectedListener(this);

Full Source Code :-

public class MainActivity extends Activity implements OnItemSelectedListener{

    Spinner spinner1,spinner2;
    String Dinner [] = {"Light","Normal","Heavy"};
    String inter [] = {"None","Yes"};
    String diner,option;
    Button result;
    TextView t1,t2;
    @Override
    protected void onCreate(Bundle savedInstanceState) {
        // TODO Auto-generated method stub
        super.onCreate(savedInstanceState);
        setContentView(R.layout.activity_main);
   
        result=(Button)findViewById(R.id.result);
        t1=(TextView)findViewById(R.id.textView1);
        t2=(TextView)findViewById(R.id.textView2);
               
        spinner1=(Spinner)findViewById(R.id.spinner1);
        ArrayAdapter<String> adapter = new ArrayAdapter<String>(this,
        R.drawable.row, R.id.value, Dinner);
        spinner1.setAdapter(adapter);
        spinner1.setOnItemSelectedListener(this);
       
        spinner2=(Spinner)findViewById(R.id.spinner2);
        ArrayAdapter<String> adapter1 = new ArrayAdapter<String>(this,
        R.drawable.row, R.id.value, inter);
        spinner2.setAdapter(adapter1);
        spinner2.setOnItemSelectedListener(this);
        /*
        result.setOnClickListener(new OnClickListener() {
           
            @Override
            public void onClick(View v) {
                // TODO Auto-generated method stub
                t1.setText(diner)
            }
        });
        */
    }

    @Override
    public void onItemSelected(AdapterView<?> arg0, View arg1, int arg2,
            long arg3) {
        // TODO Auto-generated method stub
        Spinner spin = (Spinner)arg0;
        Spinner spin2 = (Spinner)arg0;
       
        if(spin.getId() == R.id.spinner1)
        {
            diner=Dinner[arg2];
            t1.setText(diner.toString());
        }
        else if(spin2.getId() == R.id.spinner2)
        {
            option=inter[arg2];   
            t2.setText(option.toString());
        }
    }

    @Override
    public void onNothingSelected(AdapterView<?> arg0) {
        // TODO Auto-generated method stub
       
    }
}


snapshots:-


Click here to download the project:-


Friday, 20 December 2013

Rate us In Android Programmatically

In this tutorial i am going to explain a simple code By this code you can able to put a rate us button in your android application without going in any kind of browser. This code will directly take you to the play store and from there the user can rate your app. This is the great technique to increase your application status and by this your application ranking will also improve

The link which we will use is to taken from play store and then have to be split ed from the details and till the package name of your application please do not add and kind of more words like  this (&hl=en)
your link will looks like this "details?id=com.*******"

First create a button in the layout and name it as rate us (XML is shown below) :-

XML file :- 

<RelativeLayout xmlns:android="http://schemas.android.com/apk/res/android"
    xmlns:tools="http://schemas.android.com/tools"
    android:id="@+id/RelativeLayout1"
    android:layout_width="match_parent"
    android:layout_height="match_parent"
    android:orientation="vertical"
    tools:context=".MainActivity" >

    <Button
        android:id="@+id/rate"
        android:layout_width="wrap_content"
        android:layout_height="wrap_content"
        android:layout_centerHorizontal="true"
        android:layout_centerVertical="true"
        android:text="Rate Us" />

</RelativeLayout>


Second Step:-
In this step will set a on click listener on the button which we have added in our XML file and Intent code in that onclicklistener . Set the Action on intent to view  and put the sting of the market place in that setdata function of the intent. In the set data function set a URI.parse and put market link there and at last initiate the intent as startActivity.

Full Source Code:-

public class MainActivity extends Activity{

    Button rate;
   
    @Override
    protected void onCreate(Bundle savedInstanceState) {
        // TODO Auto-generated method stub
        super.onCreate(savedInstanceState);
        setContentView(R.layout.activity_main);
   
        rate=(Button)findViewById(R.id.rate);
        rate.setOnClickListener(new OnClickListener() {
           
            @Override
            public void onClick(View v) {
                // TODO Auto-generated method stub
                    Intent intent = new Intent(Intent.ACTION_VIEW);
                     intent.setData(Uri.parse
("market://details?id=com.hairtransplant.advanceinfotech.host4asia"));
                    startActivity(intent);
            }
        });
    }
}

snapshots:-


Click to Download the project:-